|
|
| [ TechGuys ] | [ Forum ] | Changing a fuel filter | [ Projects ] | [ How To ] | [ Email ] | [ Links ] |
Did you know that not only should you change your timing belt at regular service intervals as a precautionary measure but you should also change your fuel filter? It's true! You could be losing engine efficiency, and even worse - power!
| Tools / Resources: | Consumables: |
|
|
There are a few safety notes which should be covered before we illustrate a typical fuel filter change:
- gasoline is extremely flammable when in vapour form
- gasoline fumes can kill you through suffocation - work in a well ventilated area!
- have a B/C class fire extinguisher handy - preferably a powder type
- do not use any tools which present a risk of sparks or hot elements - use only "gas-vapour present "certified electronics
- never leave gas soaked rags laying around - dispose of them with accordance to local ordinances
A few administrative / technical notes which should also be noted:
- gas will deteriorate most driveway surfaces so put a plastic drop sheet down
- you should wear both safety glasses and vinyl gloves when working with gasoline
- be prepared to dispose of the clothing that you wear to do the job should you need to
| The first step will be to move your car into the
appropriate workspace - out in the open air. Be sure you choose a
level jacking area. Before you proceed further, ensure that your B/C class fire extinguisher is both present and serviceable (ie. it has passed required service inspection & has not been used since). We can not stress the importance of safety enough. |
[click for larger image] figure 1 |
|
[click for larger image] figure 2 |
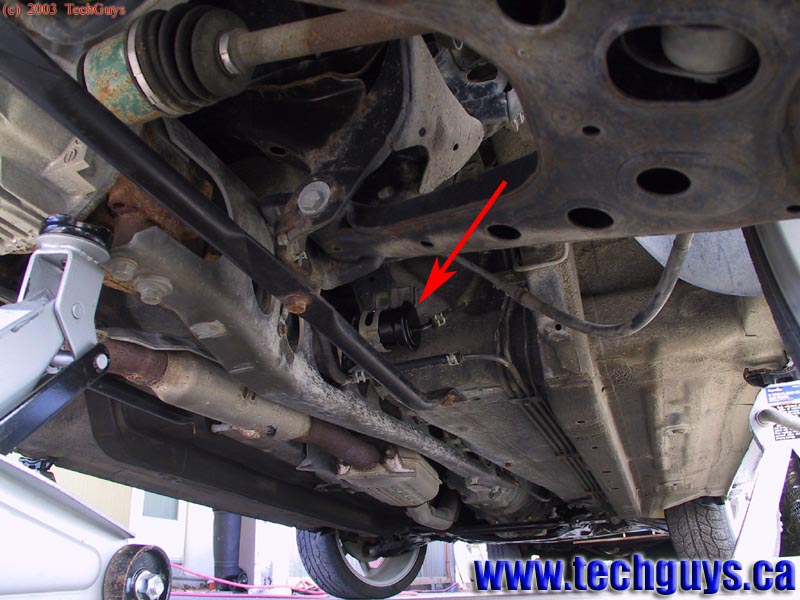
Once in position, jack up the vehicle or use appropriate ramps to raise the front or rear end of the vehicle depending on the location of your fuel filter. Chances are that the fuel filter will be located in the rear of the vehicle - near the gas tank. To aid in finding the fuel filter, trace the "hard lines" that run along the bottom of the vehicle back to their sources (generally found in a pair). |
| As a tip, if you do not have a factory manual, be sure to
ask the technician at your local dealership parts counter where the fuel
filter is located when you purchase the replacement filter. Be sure that you purchase all required hardware at this point, you do not want to leave this project partially completed. Note: the fuel filter shield has been removed for clarity - you will likely find your fuel filter behind some form of shield. |
[click for larger image] figure 3 |
|
[click for larger image] figure 4 |
Next, you will need to de-pressurize your fuel system.
There are a number of ways to do this, though we recommend that you follow
the factory approved method. In our case, we are advised to start the vehicle so that it is running - once the vehicle is running, you are to remove the fuel pump relay harness connector. Essentially, un-plug the wiring harness that connects to the fuel pump relay. |
| In our 1997 Mazda MX-5 Miata, the fuel pump relay is found
under the steering column. It is also identified as the only
connector which is yellow. Once you disconnect the relay, the vehicle should stumble and essentially die - no more combustion. Your fuel system has been de-pressurized. |
[click for larger image] figure 5 |
|
[click for larger image] figure 6 |
Once the fuel system has been de-pressurized, you will
focus your attention on removing the fuel filter. As a safety step, be sure to disconnect the negative terminal of your battery. This is a very simple step and could very well save your life - though you will likely never know it.
Start by removing any shield which should cover the fuel filter's mounting position. Do not loose any pieces of the shield and be sure to note mounting position, etc .. |
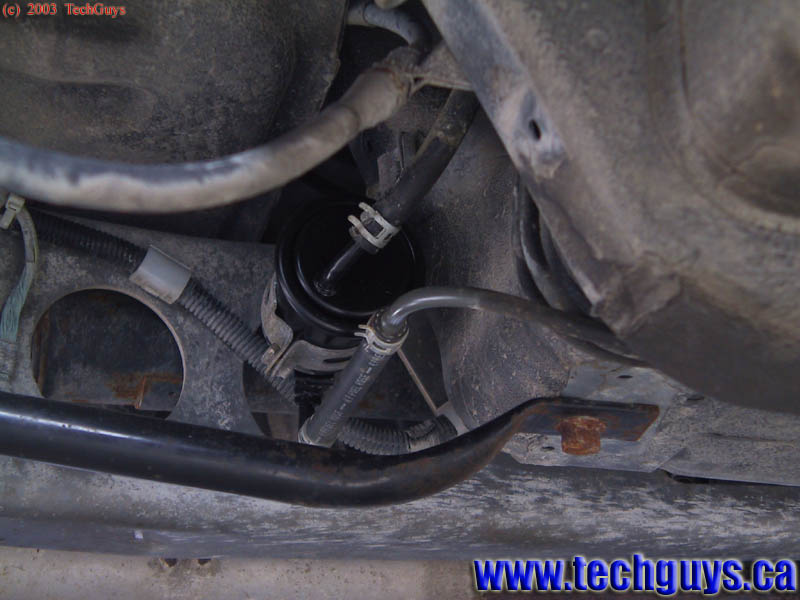
| Once any shielding, etc has been removed thus exposing the
fuel filter, place your catch pan under the fuel filter.
Remove any mounting hardware which will prevent you from removing the fuel filter. Be sure to put all fasteners in a parts container as you do not want to lose anything. |
[click for larger image] figure 7 |
|
[click for larger image] figure 8 |
Next, use your vise-grip pliers to clamp the two (or more)
hoses which attach to the fuel filter. Be sure to wrap the rubber
hoses with cloth to protect the rubber from the jaws of the vise-grips. Pay very special attention to this step! You do not want to clamp the soft metal "hard lines" - doing so will ruin them an make more work for you. Consult figure 8 for details - clamp where the arrows point, and avoid the areas marked "x". If there is to be any significant gas seepage, you will likely see it from the "sending" line which in our case is the hose in the upper-right corner. |
| Before continuing, be sure to wear your safety glasses if
you are not already doing so - also be sure to don your vinyl gloves at
this point. Once the hoses are firmly clamped, remove the factory hose clamps. Do so by using the needle nose pliers to compress the "tangs". See figure 9 for details. Once the clamps are compressed, slide them back onto the rubber hoses. |
[click for larger image] figure 9 |
|
[click for larger image] figure 10 |
Remove the hoses from the hard lines by pushing (not
pulling) the hoses. When you pull the hoses, they will have a
tendency to collapse similar to a Chinese finger trap and constrict around
the lines. Be very cautious at this stage, you are likely to have a small amount of fuel spillage as the fuel filter is full of gas, as are the un-clamped lines. You will notice that we decided to remove the fuel return line during our fuel filter change. We elected to do so as to allow us to flush the fuel return line - ridding it of any contaminants from winter storage. If you opt to do likewise, be sure to have a "catch pan" large enough. |
| Once the rubber hoses have been removed and any spillage
dealt with, pull the fuel filter away from the vehicle chassis. Remove any fuel filter mounting hardware if required and transfer it to the new fuel filter. Likewise, remove and transfer the hoses to the new fuel filter. |
[click for larger image] figure 11 |
|
[click for larger image] figure 12 |
The majority of installation will simply be the reverse of
the removal process. Be sure to re-fit the hoses onto the fuel filter at least 3.5cm (1") onto the hard lines - likewise with the vehicle's fuel lines. Generally, there will be a flared ring to show you how far the hoses must be pushed back on to. Also be sure to re-fit the hose clamps in their original positions - and be sure to press the "tangs" open to clamp down. |
| Once the fuel filter has been connected to the vehicle
fuel lines and the mounting hardware fastened to the chassis, remove the
vise-grips and watch for leaks. Once you are satisfied that there are no leaks at this point, you will need to pressurize the fuel system to ensure that there will be no high-pressure leaks. |
[click for larger image] figure 13 |
|
[click for larger image] figure 14 |
To pressurize your fuel system, you will need to consult
your factory service manual.
In the case of our project vehicle, we are advised to re-connect the fuel pump relay, and then place a jumper wire between the "F/P" and "GND" terminals on the diagnostic port. Once the pins have been "jumpered", we are to turn the ignition to the "ON" position but do not start the vehicle. |
| If you have followed the proper procedure, you should hear
a "whirring" sound of your vehicle's fuel pump working away. If not,
be sure to re-check the fuel system pressurization procedure. Once you are confident that the fuel pump is indeed pressurizing the fuel system, re-check all the fittings around the fuel filter. If you spot a leak, start back at de-pressurizing the fuel system and re-install the hose clamps. |
[click for larger image] figure 15 |
|
[click for larger image] figure 16 |
Once you are satisfied that there are no fuel leaks,
reinstall the fuel filter shield and lower your vehicle. At this point, you are finished replacing your fuel filter. It may be a good idea to double-check that you are achieving the proper fuel pressure at the fuel rail. |
|
If you feel that this article has been of any use to you, please consider
supporting the website by making a small donation.
For more info, simply click on the "Make a Donation" icon and you will be brought to a donation info page. Thanks! |
| [ TechGuys ] | [ Forum ] | Changing a fuel filter | [ Projects ] | [ How To ] | [ Email ] | [ Links ] |
(c) Copyright 2019 - James Buck - www.techguys.ca